
News
Vulkan RenderSystem in Ogre 13
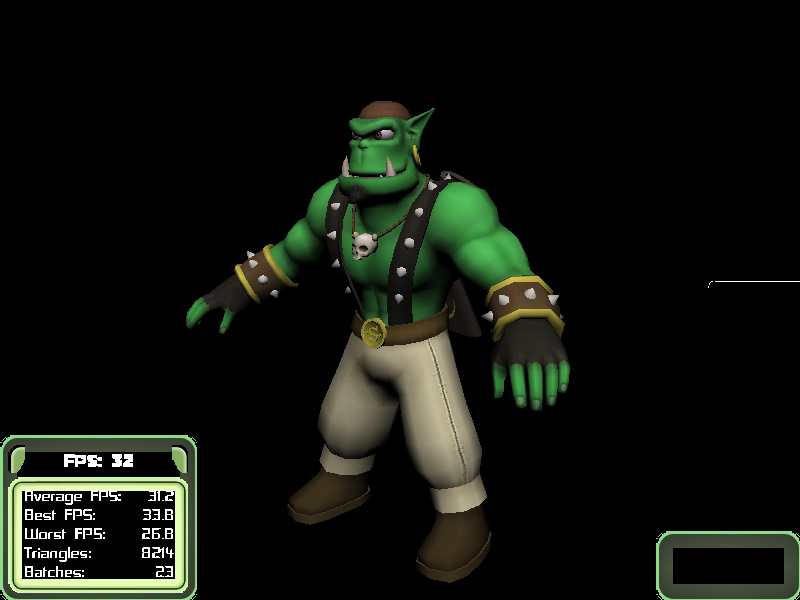
![]() The Vulkan RenderSystem backport from Ogre-next, now has landed in the master branch and will be available with Ogre 13.2. See the screenshot below for the SampleBrowser running on Vulkan
The Vulkan RenderSystem backport from Ogre-next, now has landed in the master branch and will be available with Ogre 13.2. See the screenshot below for the SampleBrowser running on Vulkan
The code was simplified during backporting, which shows by the size reduction from ~33k loc in Ogre-Next to ~9k loc that are now in Ogre.

The current implementation pretends to have Fixed Function capabilities, which allows operating with one default shader – similarly to what I did for Metal. This shader only supports using a single 2D texture without lighting. E.g. vertex color is not supported. This is why the text is white instead of black in the screenshot above.
Nevertheless, it already runs on Linux, Windows and Android.
Proper lighting and texturing support, will require some adaptations to the GLSL writer in the RTSS, as Vulkan GLSL is slightly different to OpenGL GLSL. This, and the other currently missing features will hopefully come together during the 13.x development cycle. If you are particularly keen on using Vulkan, consider giving a hand.
Right now, the main goal is to get Vulkan feature-complete first, so dont expect it to outperform any of the other RenderSystems. Due to being incomplete, the Vulkan RenderSystem is tagged EXPERIMENTAL.
Ogre ecosystem roundup #8
![]() following the last post about what is going on around Ogre, here is another update. With the Ogre 13.1 release, mainly the usability of Ogre was improved with the following additions.
following the last post about what is going on around Ogre, here is another update. With the Ogre 13.1 release, mainly the usability of Ogre was improved with the following additions.
Table of Contents
Ogre 13.1 release
The per-pixel RTSS stage gained support for two sided lighting. This is useful if you want to have a plane correctly lit from both sides or for transparency effects, as shown below:


Furthermore, PCF16 filtering support was added to the PSSM RTSS stage. This gives you softer shadows at the cost of 4x the texture lookups. The images below show crops from the ShaderSystem sample at 200% highlighting the effect


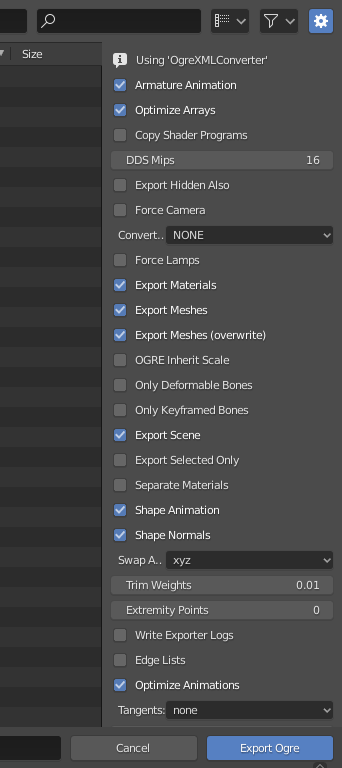
blender2ogre improved even further
Thanks to the continued work by Guillermo “sercero” Ojea Quintana, blender2ogre gained some exciting new features.
The first is support for specifying Static and Instanced geometry like this. You might wonder whether you should be using that and if yes, which variant. Therefore, he also collected the respective documentation which is available here.
The second notable feature is support for .mesh import, which might come handy if you are modding some Ogre based game or just lost the source .blend file. This feature is based on the respective code found in the Kenshi Blender Plugin (which in turn is based on the Torchlight plugin).
Then, old_man_auz chimed in and fixed some bugs when exporting to Ogre-Next, while also cleaning up the codebase and improving documentation.
Finally, yours truly added CI unit-tests, which make contributing to blender2ogre easier.
OpenAL EFX support in ogre-audiovideo
Again, contributed by sercero are some important additions to the audio part of the ogre-audiovideo project which drastically improve the useability.
The first one is that you no longer need boost to enable threading. OgreOggSound will now follow whatever Ogre is configured with.
The second one is being able to use EFX effects with openal-soft instead of the long-dead creative implementation. This enables effects like reverb or bandpass filters.
Read more in the release-notes. This release was too, done by sercero which kindly took the burden of co-maintaining the project.
Ogre 13 released
![]() We just tagged the Ogre 13 release, making it the new current and recommended version. We would advise you to update wherever possible, to benefit from all the fixes and improvements that made their way into the new release.
We just tagged the Ogre 13 release, making it the new current and recommended version. We would advise you to update wherever possible, to benefit from all the fixes and improvements that made their way into the new release.
This release represents 2.5 years of work from various contributors when compared to the previous major 1.12 release. Compared to the last Ogre minor release (1.12.12), however we are only talking about 4 months. Here, you will mainly find bugfixes and the architectural changes that justify the version number bump.
Table of Contents
For source code and pre-compiled SDKs, see the downloads page.
read more…Ogre ecosystem roundup #7
![]() following the last post about what is going on around Ogre, here is another update. With the Ogre 1.12.12 release, mainly the usability of Ogre was improved with the following additions.
following the last post about what is going on around Ogre, here is another update. With the Ogre 1.12.12 release, mainly the usability of Ogre was improved with the following additions.
Table of Contents
- Ogre 1.12.12 release
- Python SDK as PIP package
- Improved blender2ogre
- .scene support in ogre-meshviewer
Ogre 1.12.12 release
The last 1.12 release had some serious regressions in D3D9 and GL1, therefore I scheduled one more release in the 1.12.x series.
Updated release notes
As the Ogre 1.12 series was an LTS release, many important features landed after the initial 1.12.0 release. To take this into account and to give an overview which version you need, the “New and Noteworthy” document was updated with the post .0 additions. (search for “12.” to quickly skim through them).
Nevertheless, there are also some new features in the 1.12.12 release itself:
Cubemap support in compositors
Compositors render targets can now be cubemaps by adding the cubic keyword to the texture declaration – just like with material texture_units.
To really take advantage of this, you can now also specify the camera to use when doing render_scene passes. This way any camera in your scene can be used as an environment-probe for cube mapping.
Finally, to really avoid touching any C++, there is now the align_to_face keyword which automatically orients the given camera to point to the targeted cubemap face.
See this commit on how these things can simplify your code and this for further documentation.
Terrain Component in Bindings
Thanks to a contribution by Natan Fernandes there is now initial support of the Terrain Component in our C#/ Java/ Python bindings.
Python SDK as PIP package
Python programmers can now obtain a Ogre SDK directly from PyPI as they are used to with:
pip install ogre-pythonJust as the MSVC and Android SDKs, it includes the assimp plugin which allows to load almost any mesh format and ImGui, so you can create a UI in a breeze.
For now only Python 3.8 is covered – but on all platforms. This means you can now have a pre-compiled package for OSX and Linux too.
Improved blender2ogre
Thanks to some great work by Guillermo “sercero” Ojea Quintana, the blender2ogre export settings are much more user friendly now:
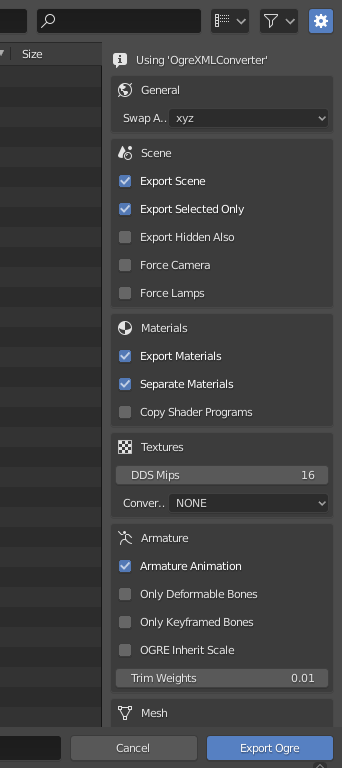
On top of having some context what a option might do, the exporter can now also let Ogre generate the LOD levels. This gives you the choice to
- Iteratively apply blender “decimate” as in previous releases. This will generate one
.meshfile per LOD level, but may result in a visually better LOD - use the Ogre MeshLOD Component. This will store all LOD levels in one
.meshfile, only creating a separate index-buffer per LOD. This will greatly reduce storage compare to the above method.
SceneNode animations
But he did not stop there, blender2ogre now also exports NodeAnimationTrack based animations. To this end it follows the format introduced by EasyOgreExporter, so both exporters are compatible to each other.
To formalise this, he even extended the .scene type definition, so other exporters implementing this function can validate their output.
Needless to say, he also extended the DotScene Plugin shipped with 1.12.12 to actually load these animations.
.scene support in ogre-meshviewer
Picking up the work by Guillermo, I exteded ogre-meshviewer to load .scene file – in addition to .mesh files and whatever formats assimp knows about.
However, for now it will merely display the scene – there are no inspection tools yet.
Ogre 1.12.11 released
![]() Ogre 1.12.11 was just released. This is the last scheduled release for the 1.12 series and contains many bugfixes and new features. The smaller ones are:
Ogre 1.12.11 was just released. This is the last scheduled release for the 1.12 series and contains many bugfixes and new features. The smaller ones are:
- Gamepad Support in OgreBites
- Restructured GPU Program Script documentation
- Added Camera::setSortMode to account for rendering 2D layers instead of 3D geometry (as with 2D games)
The more notable new features will be presented in more detail in the following
Table of Contents
- Support for animated particles
- Software RenderSystem
- Transparent headless mode on Linux
- Improved Bullet-Ogre integration
Support for animated particles
Support for animating particles via Sprite-sheet textures was added. This enables a whole new class of effects with vanilla Ogre that previously required using particle-universe.


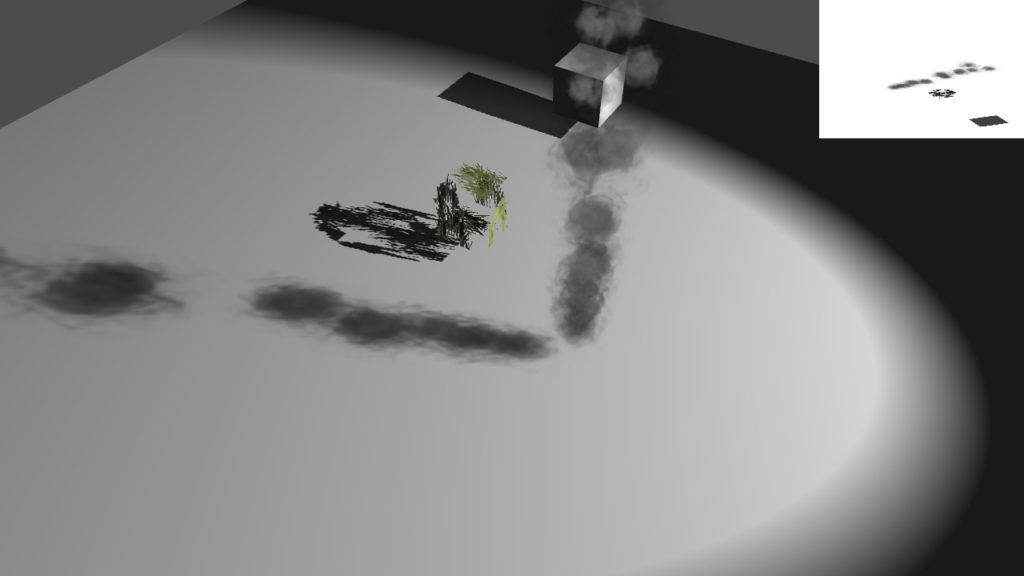
On the screenshots above, you see the Smoke demo, that was updated to showcase the new feature. However, the screenshots do not do full justice to the feature. If you are interested, it is best to download the SampleBrowser build and see the effect in action.
See this post (targeting blender) for an overview of the general technique.
For running the animation, the new TextureAnimator Affector was added.
While at it, I fixed several bugs deep in Ogre that prevented ParticleSystems to be properly treated as shadow casters. Now you can call setCastShadows as with any other entity and things will just work (see last image).
Software RenderSystem
Did you ever want to launch a Python Interpreter from your Shader or make HTTP requests per-pixel? Well, the wait is finally over – with the new TinyRenderSystem in Ogre 1.12.11 you can.
This render-system is based on the tinyrenderer project, which implements a full software-rasterizer in ~500 loc. If you are curious on how OpenGL works internally, I highly recommend taking a closer look.
For Ogre this had to be doubled to about ~1350 loc, but compared to the Vulkan RenderSystem from 2.x at ~24000 loc it is still tiny (note that this is already after stripping down the v2.3 implementation).
So what do we gain by having that RenderSystem? First it is a nice stress-test for Ogre, as this is a backend implemented in Ogre itself; each Buffer uses the DefaultBuffer implementation and each Texture and RenderWindow is backed by an Ogre::Image.
This makes it also a great fit for offline conversion tools, that want full access to the resources, without needing to actually access the GPU.
Next, this is really useful if you want to Unit-Test a Ogre-based application. Typically, you would need to set-up a headless rendering server (more on that below) to merely check whether your triangle is centered correctly in the frame. This is super easy now.
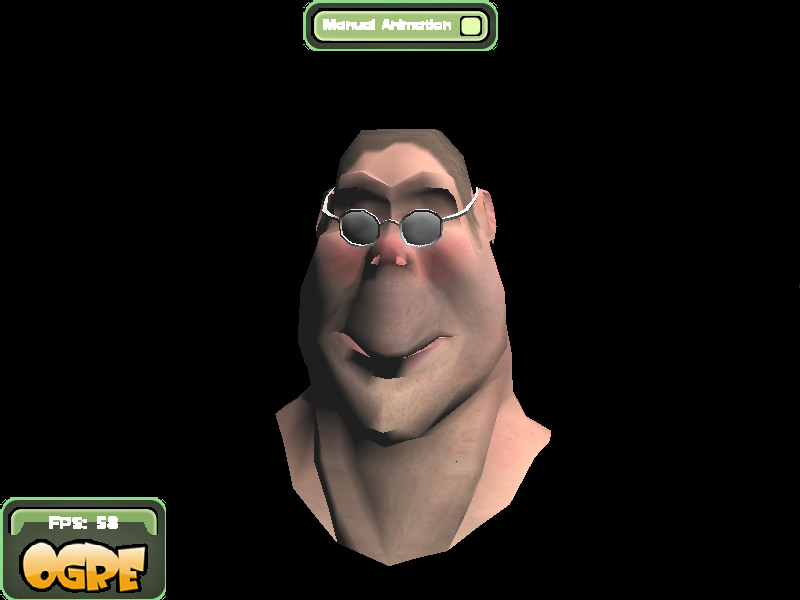


The screenshots on top, taken from the SampleBrowser, show you how far you can actually get with the RenderSystem. Note that there is no alpha blending, no mipmapping, no user-provided shaders and generally no advanced configuration of the rasterization. So if you are after full-featured software rasterization, you are better off with OpenGL on MESA/llvmpipe.
However, if you want to experiment with the rendering pipeline without being bound by the OpenGL API, this is the way to go. You actually can do the HTTP requests per pixel ;). Also, for creating a new RenderSystem, this is the least amount of reference code to read.
Transparent headless mode on Linux
Rendering on a remote machine over ssh just got easier! Previously ogre required a running X11 instance, which can be a hassle to come by on a machine without any monitors attached (e.g. a GPU server).
Instead of bailing out, Ogre will now merely issue a warning and transparently fall-back to a PBuffer based offscreen window. See this for the technical background.
To be able to do so Ogre must be using EGL instead of GLX, to do so it must be compiled with OGRE_GLSUPPORT_USE_EGL=1. With 1.13, we will be using EGL instead of GLX by default.
Compared with the EGL support recently added in v2.2.5, the implementation is much simpler and does provide any configuration options – but on the plus side the flag above is the only switch to toggle to get it running.
Improved Bullet-Ogre integration
I added a simplified API to the btogre project.
https://github.com/OGRECave/btogre
If you want to have physics on top of your rendering, it is now as simple as:
auto mDynWorld = new BtOgre::DynamicsWorld(gravity_vec);<br>mDynWorld->addRigidBody(weight, yourEntity, BtOgre::CT_SPHERE);where (as in Bullet) a weight of 0 means static object. Now you can call
mDynWorld->getBtWorld()->stepSimulation(evt.timeSinceLastFrame);and your objects will interact with each other. Of course if you need more control, the unterlying bullet types are still fully exposed.
Oh, and python bindings are now available too.
Ogre 2.2.5 Cerberus Released and EGL Headless support!
This is a special release! Most Ogre 2.1.x and 2.2.x releases, it only contains maintenance fixes and no new features.
Thus efforts to port from 2.2.4 to 2.2.5 should be minimum. And this still holds true.
But there is a new feature!
This feature was sponsored by Open Source Robotics Corporation and was written to be used by the Ignition Project
EGL Headless
OpenGL traditionally requires a window. Without a window, OpenGL cannot be used. This implies either X11 or Wayland is installed and running; which can be a problem when running on cloud servers, VMs, embedded devices, and similar environments.
Direct3D11 doesn’t have this flaw, but it does not run on Linux.
Vulkan also doesn’t have this flaw, but its support is new (coming in Ogre 2.3) and is not yet robust and tested enough. Additionally SW implementations have yet to catch up.
Ogre can use the NULL RenderSystem to run as a server without a window, however this doesn’t actually render anything. It’s only useful to pretend there is a screen so that apps (mostly games) can reuse and turn client code into server code. It’s also useful for mesh manipulation and conversion tools which need to read Ogre meshes but don’t actually render anything.
Fortunately, Khronos introduced a workaround with EGL + PBuffers (not to be confused with 2000-era PBuffers which competed against FBOs) where an offscreen dummy ‘window’ could be created to satisfy OpenGL’s shenanigans.
Because PBuffer support in some EGL drivers are not well tested (e.g. sRGB support was only added in EGL 1.5, which Mesa does not support) Ogre creates a 1×1 PBuffer alongside the Context and uses an FBO internally for the ‘Window’ class. By using a dummy 1×1 PBuffer tied with the GL context, OpenGL context creation becomes conceptually free of window interfaces, like in D3D11 and Vulkan.
Switchable interfaces: GLX and EGL
When Ogre is built with both OGRE_GLSUPPORT_USE_GLX and OGRE_GLSUPPORT_USE_EGL_HEADLESS, toggling between GLX and EGL can be done at runtime.
This is how it looks:
Originally the GLX interface will be selected:

But after switching it to EGL Headless, only a couple options appear (since stuff like Resolution, VSync, Full Screen no longer make sense)

And like in D3D11/Vulkan, it is possible to select the GPU. /dev/dri/card0 is a dedicated AMD Radeon HD 7770 GPU, /dev/dri/card1 is a dedicated NVIDIA GeForce 1060. Yes, they can coexist:

NVIDIA seems to expose 2 “devices” belonging to the same card. ‘EGL_NV_device_cuda … #0’ is a headless device. Trying to use ‘EGL_EXT_device_drm #1’ will complain that it can’t run in headless mode. It seems it is meant for use with GLX.
‘EGL_EXT_device_drm #2’ is the AMD card.
EGL_MESA_device_software is SW emulation
We chose not to include the marketing names in device selection because Linux drivers (propietary and open source) have the tendency of changing the exposed OpenGL marketing labels quite often in subtle ways. This could break config settings quite often (i.e. the saved chosen device can no longer be found after a driver upgrade), increasing maintenance burden when this feature is meant for automated testing and similar.
Complete X11 independence
Users who need to be completely free of X11 dependencies can build with OGRE_GLSUPPORT_USE_EGL_HEADLESS + OGRE_CONFIG_UNIX_NO_X11.
This will force-disable OGRE_GLSUPPORT_USE_GLX as it is incompatible. GLX requires X11.
Headless SW Rasterization
It is possible to select the Mesa SW rasterization device. So even if there is no HW support, you can still use SW.
Please note Mesa SW at the time of writing supports up to OpenGL 3.3, which is the bare minimum to run Ogre. Some functionality may not be available.
Update: It has been called to my attention that llvmpipe (aka SW emulation) supports OpenGL 4.5 since Mesa 20.3.0
More info
This new feature seems to be very stable and has been tested on NVIDIA, AMD (Mesa drivers) and Intel.
Nonetheless it is disabled by default (i.e. OGRE_GLSUPPORT_USE_EGL_HEADLESS is turned off) which means it should not affect users who are not caring about headless support.
For more details, please see the README of the EglHeadless tutorial.
Running EglHeadless sample should result in a CLI interface:

OpenGL ES 3.x may be around the corner?
With EGL integration, it should be possible to create an EGL window and ask for an ES 3.x context instead of an OpenGL one. There is a lot of similarities between ES 3 and OpenGL 3.3, and we already have workarounds for it as they’re the same ones we use for macOS.
While I don’t have very high hopes for Android, WebGL2 may be another story.
If such feature is added into the roadmap, it would probably be for 2.3 though.
RenderDoc integration
Functions RenderSystem::startGpuDebuggerFrameCapture and RenderSystem::endGpuDebuggerFrameCapture were added to programmatically capture a RenderDoc frame. This was necessary for RenderDoc to work with headless rendering, but it works with all APIs in most platforms.
Users can call RenderSystem::getRenderDocApi if they wish to perform more advanced manipulation:
if( rs->loadRenderDocApi() )
    RENDERDOC_API_1_4_1 *apiHandle = rs->getRenderDocApi();
About the 2.2.5 release
For a full list of changes see the Github release
Source and SDK is in the download page.
Discussion in forum thread.
Thanks again to Open Source Robotics Corporation for sponsoring this feature for their Ignition Project
Ogre 2.1.1 Baldur Released!
This is a maintenance release. Efforts to port from 2.1.0 to 2.1.1 should be minimum.
For a full list of changes see the Github release
Source and SDK is in the download page.
Discussion in forum thread.
Augmented Reality made simple – with Ogre and OpenCV
![]() As a small Christmas present, I want to show you how easy it has become to make Augmented Reality yourself thanks to Ogre and OpenCV. You should know that my other interest, besides graphics, lies with Computer Vision.
As a small Christmas present, I want to show you how easy it has become to make Augmented Reality yourself thanks to Ogre and OpenCV. You should know that my other interest, besides graphics, lies with Computer Vision.
The demo will not rely on proprietary solutions like ARCore or ARKit – all will be done with open-source code that you can inspect an learn from. But lets start with a teaser:

This demo can be put together in less than 50 lines of code, thanks to the OpenCV ovis module that glues Ogre and OpenCV together. Next, I will briefly walk you through the steps that are needed:
First, we have to capture some images to get by the Reality part in AR. Here, OpenCV provides us an unified API that you can use for your Webcam, Industrial Cameras or a pre-recorded video:
import cv2 as cv

imsize = (1280, 720) # the resolution to use
cap = cv.VideoCapture(0)
cap.set(cv.CAP_PROP_FRAME_WIDTH, imsize[0])
cap.set(cv.CAP_PROP_FRAME_HEIGHT, imsize[1])

img = cap.read()[1] # grab an image
then, we have to set up the most crucial part in AR: camera tracking. For this, we will use the ArUco markers – the QR-like quads that surround Sinbad. To no surprise, OpenCV comes with this vision algorithm:
adict = cv.aruco.Dictionary_get(cv.aruco.DICT_4X4_50)
# extract 2D marker-corners from image
corners, ids = cv.aruco.detectMarkers(img, adict)[:2]
# convert corners to 3D transformations [R|t]
rvecs, tvecs = cv.aruco.estimatePoseSingleMarkers(corners, 5, K, None)[:2]
If you look closely, you see that we are using a undefined variable "K" – this is the intrinsic matrix specific for your camera. If you want precise results, you should calibrate your camera to measure those. For instance using the web-service at calibdb.net, which will also just give you the parameters, if your camera is already known.
However, if you just want to continue, you can use the following values that should roughly match any webcam at 1280x720px
import numpy as np
K = np.array(((1000, 0, 640), (0, 1000, 360), (0, 0, 1.)))
So now we have the image and the according 3D transformation for the camera – only the Augmented part is missing. This is where Ogre/ ovis come into play:
# reference the 3D mesh resources
cv.ovis.addResourceLocation("packs/Sinbad.zip")
# create an Ogre window for rendering
win = cv.ovis.createWindow("OgreWindow", imsize, flags=cv.ovis.WINDOW_SCENE_AA)
win.setBackground(img)
# make Ogre renderings match your camera images
win.setCameraIntrinsics(K, imsize)
# create the virtual scene, consisting of Sinbad and a light
win.createEntity("figure", "Sinbad.mesh", tvec=(0, 0, 5), rot=(1.57, 0, 0))
win.createLightEntity("sun", tvec=(0, 0, 100))
# position the camera according to the first marker detected
win.setCameraPose(tvecs[0].ravel(), rvecs[0].ravel(), invert=True)- You can find the full source-code for the above steps, nicely combined into a main-loop over at OpenCV.
- Alternatively, see this Ogre Sample which works with both Ogre and OpenCV installed via pip
To record the results, you can use win.getScreenshot() and dump it into a cv.VideoWriter – contrary to the name, this works in real-time.
Extending the above code to use cv.aruco.GridBoard as done in the teaser video is left as an exercise for the reader as this is more on the OpenCV side.
Also, If you rather want to use ARCore on Android, there is a Sample how to use the SurfaceTexture with Ogre. Using this, you should be able to modify the hello_ar_java sample from the arcore-sdk to use Ogre.
Ogre 1.12.10 released
![]() Ogre 1.12.10 was just released. This “holiday release” contains mostly bugfixes, however there are also some notable additions.
Ogre 1.12.10 was just released. This “holiday release” contains mostly bugfixes, however there are also some notable additions.
But first, we want thank everyone for their support, as we reached 2000 stars on github.
Table of Contents
- Native GLES2 RenderSystem on Windows
- Improved RenderToVertexBuffer
- Improved ParticleSystem
- Easy 3D Text – aka MovableText out of the box
Native GLES2 RenderSystem on Windows
Due to some work on WGL, you can now build and use the GLES2 RenderSystem on windows without any glue libraries like ANGLE. Consequently it is included in the SDK, so it is easy to try. If you are on NVIDA/ Intel that is – AMD does not support the respective extension. There are no screenshots here, as they would look almost exactly like on GL3+.
Improved RenderToVertexBuffer
Shaders bound to RenderToVertexBuffer (aka. Transform Feedback/ Stream Output) can now use auto parameters (param_named_auto) as in any other stage.
Furthermore the D3D11 implementation was updated and the GPU particles samples now also runs on D3D11 too.
Improved ParticleSystem
The ParticleSystem and the default BillboardParticleRenderer received some optimization regarding Colour and bounds related computations.
Notably, Ogre now uniformly samples the Particle direction, where it would previously incorrectly bias towards the poles:


Easy 3D Text – aka MovableText out of the box
While working on the Particles I got the idea that one could re-purpose the existing BillboardSet for 3D text rendering, and indeed it fits perfectly as you see above. No more snippets from the Wiki needed and everything integrates with the existing API as:
auto font = FontManager::getSingleton().getByName("SdkTrays/Caption");
auto bbs = mSceneMgr->createBillboardSet();

font->putText(bbs, "OGRE\n ...", 10);
Furthermore, I fixed the glyph packing code which now correctly aligns the font-atlas elements, thus obsoleting the character_spacer tuning option.
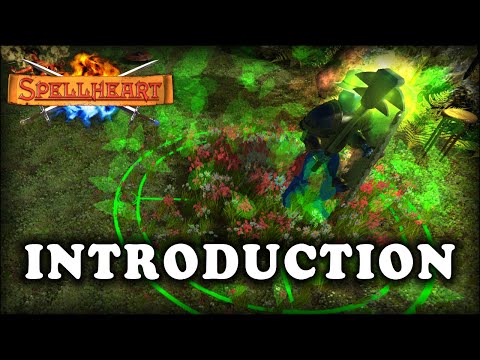
Game Highlight – Spellheart
Today we want to present another Game highlight of Ogre3D based games. This time: Spellheart
We asked the team behind the game if they could share some insights into the Ogre3D usage and how the game was built in general, and Robin was kind enough to provide those:
Spellheart is a MOBA (Multiplayer online battle arena) game. You can build your entirely own class by choosing items and abilities, and with an extremely customizable server that anyone can host, the possibilities are endless.
The game is based upon an idea that I have never seen before. Most RPG games are static, limiting your build options and forcing you to min/max. In this game, there is no best build because there are no classes. You create your own build without limitations or restrictions. With a customizable server, gameplay can be balanced in real time.
I have been working on Spellheart myself from the start, though some friends have helped me with a few assets. As I am only a programmer, I can only do that part of the game. The 3D models and sounds in the game are mostly from people that put them out for free with good copyrights.
I am using Ogre version 1.11.2, but I have modified the source for some minor things, such as making particles be able to use an atlas. I have also made a lot of custom particle affectors.
All shaders in the game are written by hand, there is no on-the-fly automatic generation of shaders. Though I have written a program that helps me with this, so that I only have to alter one base shader to then generate all shaders at once for D3D9/ CG/ D3D11.

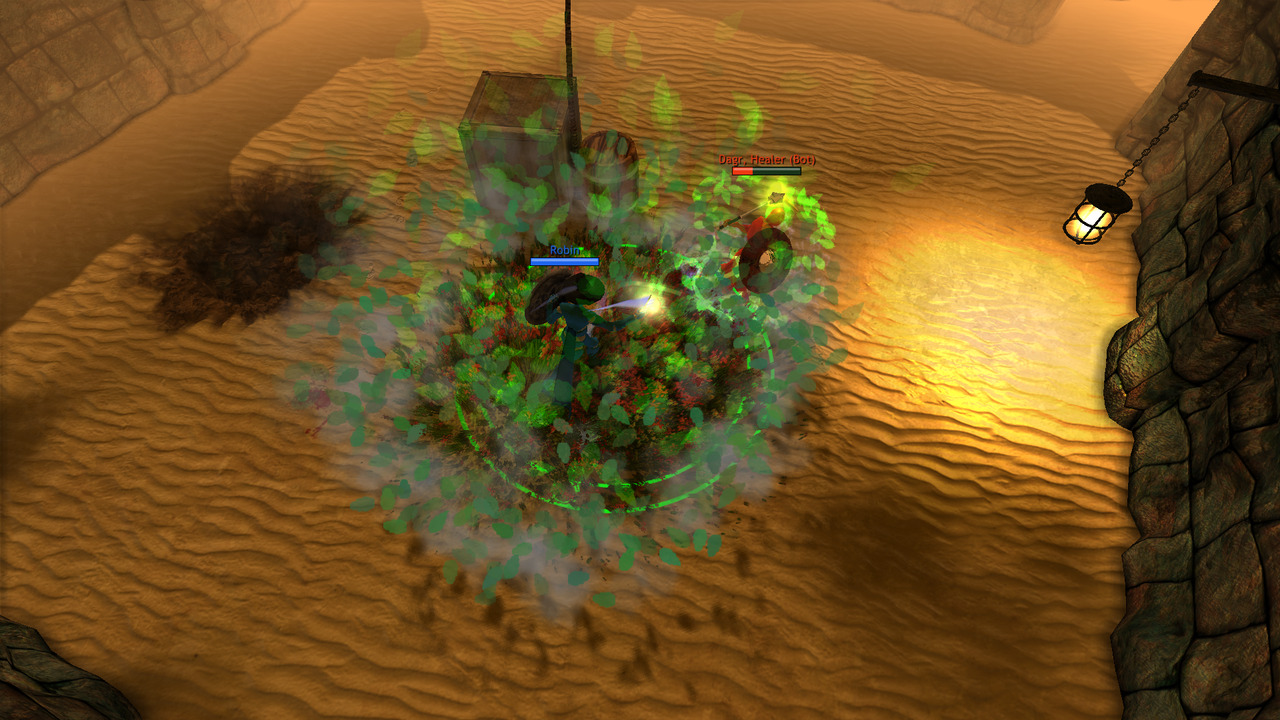
I do not use Deferred shading or anything like that, just normal Forward shading. Since my shaders can handle up to 20 lights and the game being top-down, there is no need for me to have support for more lights. Forward shading is therefore perfect for this game, while being faster than the newer techniques.
I use a lot of batching through a custom-written ManualObject class to make a lot of smaller objects into one single batch in a very optimized manner. This happens for things in the game such as grass and footsteps on sand.
I also use the built-in Instancing (HW Basic) on the static objects in my game. Since the game is top-down, this usually does not help that much, but “Many a little makes a mickle”. I live by that expression, optimizing everything I see can be a bottleneck. That is why the game can run in a very high FPS (500 FPS with a few changes in the options menu on my computer).
An edited version of Gorilla is used for the GUI of the game, but I also made a custom atlas generator for it to make it much easier to use. This also enables me to use a normalmap for each GUI element which is shown by a light from the cursor.
At the moment, the game only works for Windows (x64), but as Ogre can be compiled for all platforms, Linux and Mac could be added in the future (and also then using GLSL instead of CG).
The option menu in the game has extremely many options to make the game run on any kind of hardware (even Fixed Function Pipeline is possible through this).
I like Ogre because its community is helpful and that you can easily alter the source code if you want.
Many game engines out there are based around being a tool-user instead of being a programmer, and I don’t want that. Those engines also seem to have performance issues in many of their games, unless you have a very high-end computer. Therefore, Ogre is the ultimate engine for me. It allows me to be a programmer and not just a tool-user, while being able to make games for low-end computers all they way up to high-end.
Libraries I use in the code
- Ogre3D (Rendering)
- Gorilla (GUI, though a bit modified)
- enet (Networking)
- Bullet (Physics)
- OpenAL (Sound)
- CEF (In-game browser)
- Theora (Video)
- FLTK (GUI, for the server only)
- Qt (GUI, for the launcher only)
Programs I use for the game
- Visual Studio 2017 (Compiler)
- Blender (3D models)
- GIMP (Textures)
- Inno Setup (Installer)