
Over the last few weeks a new sample appeared: Tutorial_OpenVR
We’ve integrated OpenVR into Ogre.
The tasks done to achieve this can be summarized into five:
- Added ‘VrData’ which is passed to Camera::setVrData. This simplifies passing per-eye view matrices and custom projection matrices required by the VR headset
- Added Instanced Stereo support
- Account for the running-start
- Added Stencil Hidden Area Mesh optimization
- Added Radial Density Mask optimization
Added ‘VrData’
There’s not much to say here. The new struct is simple, pretty much self explanatory and the sample shows how to use it.
Basically now you can easily pass view and projection matrices that VR SDKs typically give you, without having to create multiple cameras, working the math yourself, or use our obscure custom projection API to setup the projection matrices.
Instanced Stereo
Instanced Stereo allows us to render geometry to both eyes in a single pass. This can save a lot of CPU time. It might also improve GPU performance due to cache effects.
We render everything 2x by doubling the instance count, and output even instances to the left eye’s viewport and odd instances to the right eye’s viewport.
If you’re using OpenGL, your GPU and driver needs to support the GL_ARB_shader_viewport_layer_array extension.
If you’re using Direct3D 11, you must be running Windows 10 that supports Direct3D 11.3, and D3D11_FEATURE_DATA_D3D11_OPTIONS3::VPAndRTArrayIndexFromAnyShaderFeedingRasterizer capability must be true.
Any Desktop GPU that’s within the minimum requirements to render VR should meet these requirements. Just make sure your Software (OS and drivers) is up to date.
Currently we only tested this feature with Oculus and Vive headsets, which only shift the camera translation between eyes; but there are headsets such as the Pimax 5k+ and StarVR with large FOVs that may require also rotating the camera.
While our instanced stereo code might work with it and has been designed to support rotation, we couldn’t test it, and in some cases it may not be possible to fully support it due to the very nature of FOVs larger than 180°.

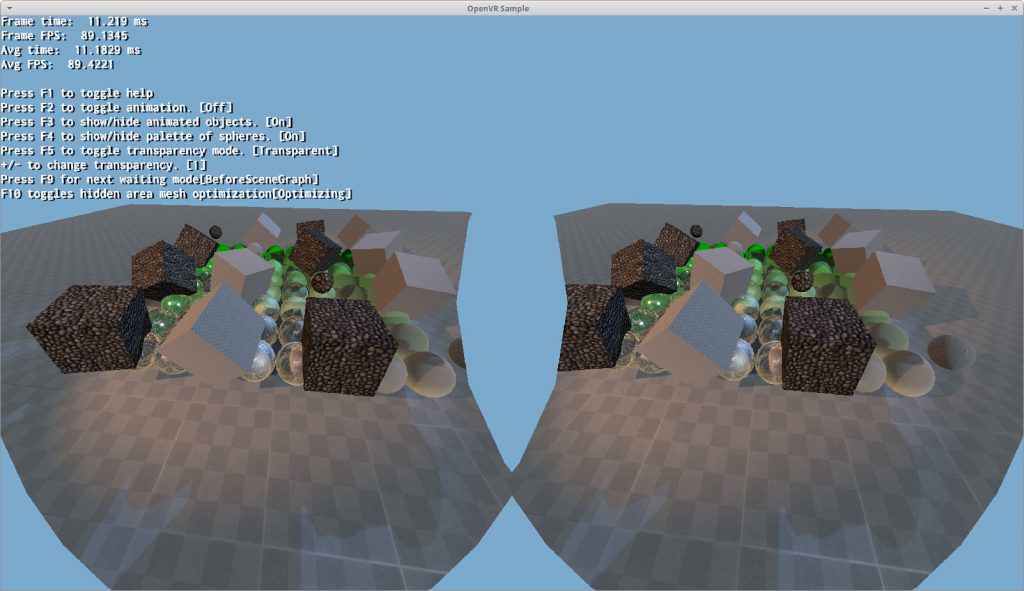
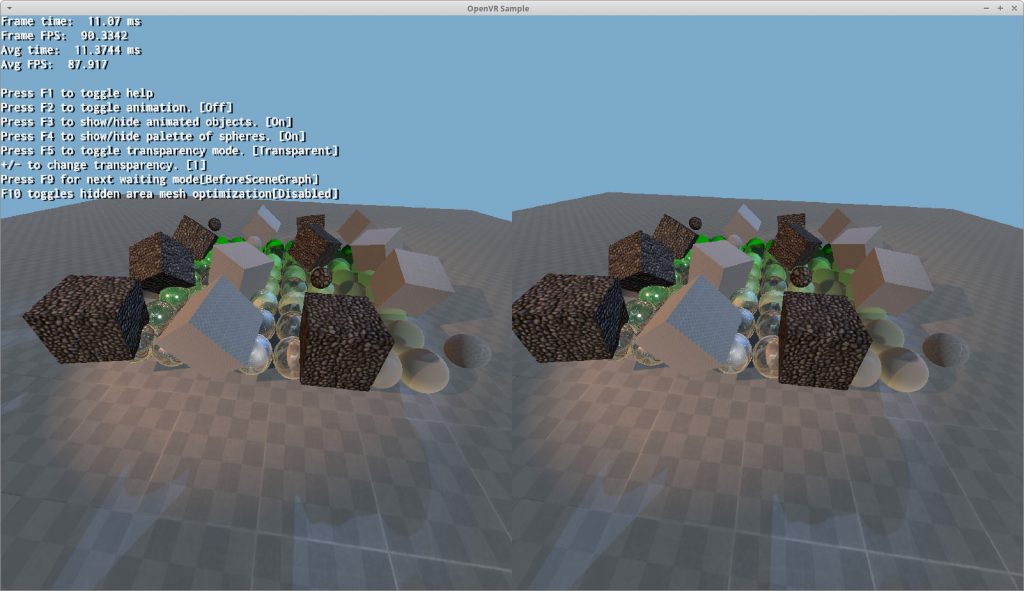
Account for the running-start
If you’ve read Advanced VR Rendering Alex Vlachos, Valve GDC 2015 or watched his presentation at around min 21:04 then you may have heard about the running start.
If you haven’t, then maybe you have heard complaints that WaitGetPoses destroys performance.
This issue has also affected several of our Ogre users who tried to integrate OpenVR on their own: their applications were perfectly capable of hitting 90 fps or more (even when rendering in stereo), however once the WaitGetPoses starts getting called, framerate would tank usually going to 45 or 60; and reprojection kicking it frequently.
Although the algorithm is intended to maximize performance and minimize latency, failure to understand the running start leads to severe performance degradation. The running start means that WaitGetPoses will block until 3ms before the next VSync.
That means your CPU code has 3ms left to do all of its work and submit it to the GPU. If it takes more, then VSync is missed and you won’t be able to reach 90hz.
Call WaitGetPoses too early (i.e. right after D3D Present / GL SwapBuffers) and you will force your app to process everything in 3ms (CPU wise).
Call WaitGetPoses quite late (i.e. after 3ms before VSync, but before VSync) and you lose any performance advantage and the GPU will likely miss the VSync anyway or have bubbles; or you’ll have the CPU sitting idle.
Call WaitGetPoses extremely late (after vblank) and you’re already not reaching at 90hz.
Think of WaitGetPoses calls as a glass of water: you don’t want to leave the glass empty (because that’s a waste of idle space) so you try to fill it as much as possible. But you absolutely don’t want it to spill (because that causes you to miss a VBlank).
That means WaitGetPoses calls needs to be moved around. But there is no one true place to call it. That will depend on the complexity of your scene and how fast the CPU is.
Therefore the location at which WaitGetPoses gets called must be altered at run time. We’ve added 6 waiting modes:
enum VrWaitingMode
{
     AfterSwap,
     BeforeSceneGraph,
     AfterSceneGraph,
     BeforeShadowmaps,
     BeforeFrustumCulling,
     AfterFrustumCulling,
};
Checkout the code comments for further explanation.
Therefore our tutorial shows you how to move WaitGetPoses around and the exact waiting mode depends on your scene. Very complex and heavy scenes will likely want to move calling WaitGetPoses towards AfterFrustumCulling (as late as possible), while simple scenes can move it towards AfterSwap (as early as possible).
I tried to automate the process (i.e. determine the best waiting mode by benchmarking the current scene) but I failed: finding the best place isn’t just about the highest performance, it needs to be measured with the headsets on. Some waiting modes will deliver higher framerate on paper, but it will feel more stuttery (specially if it’s not a multiple of 90). This is hard because we’re not in control of when Reprojection kicks in.
Unfortunately my current recommendation is to expose this setting to the user, let the user cycle through them and let him decide what feels best.But you can at least pick a good default.
In the tutorial sample you can cycle through the waiting mode hitting F10, and you will also see how SteamVR reports different timing per frame (YMMV depending on your CPU speed. If it doesn’t change, then edit the sample to render a lot more objects).
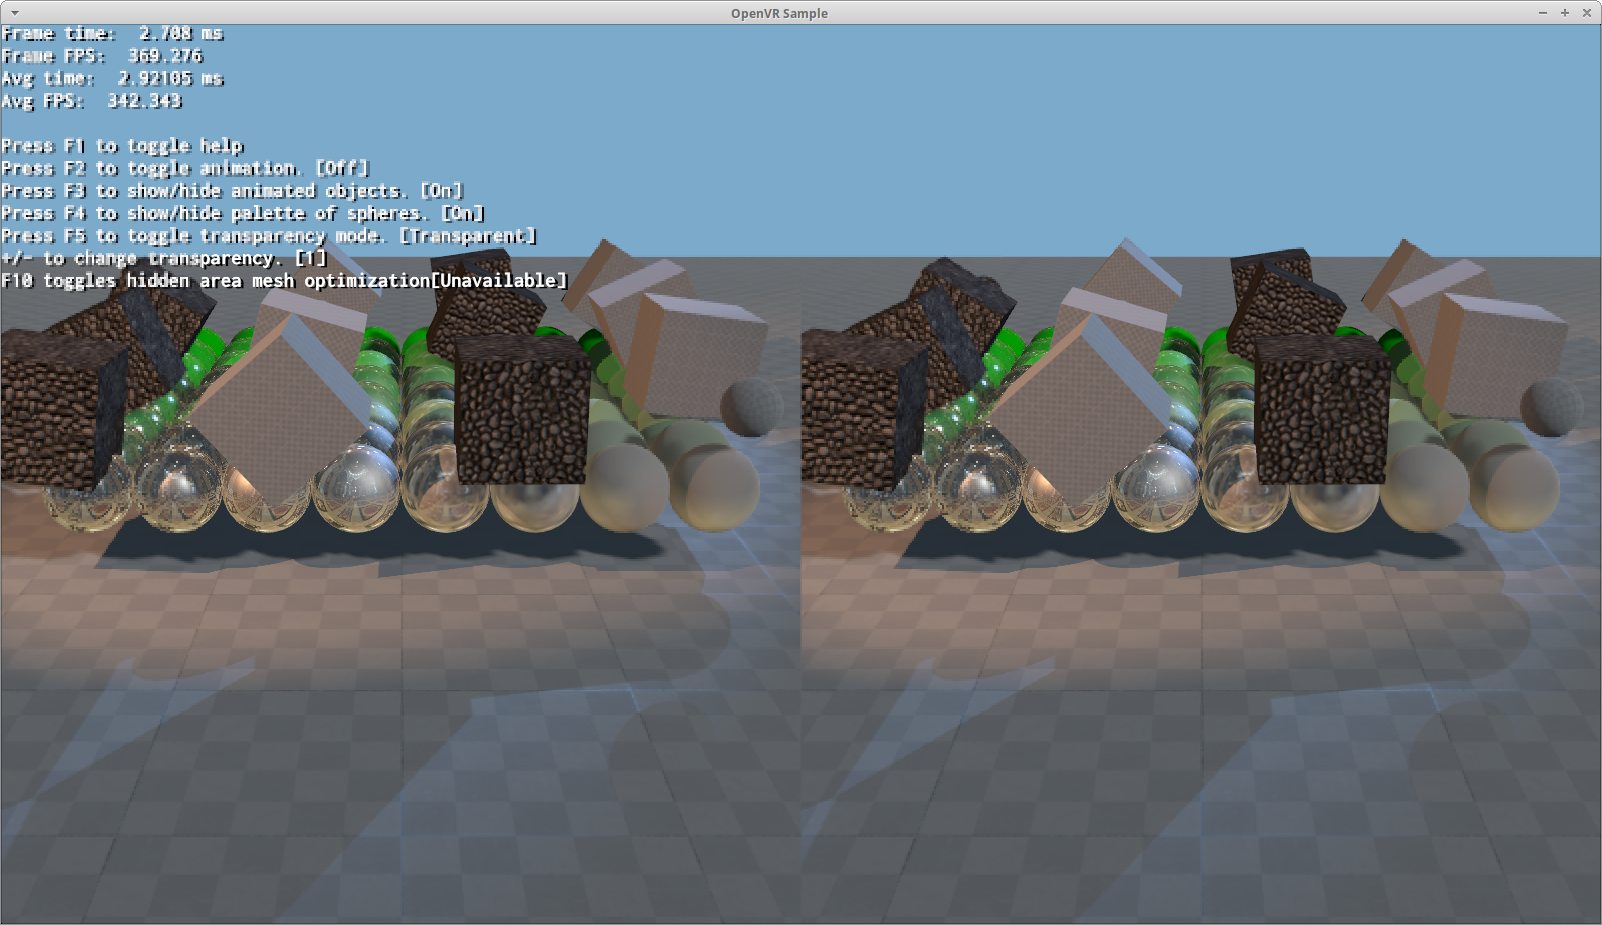
Stencil Hidden Area Mesh optimization
In the same talk as the running start, Alex Vlachos proposes a stencil hidden area mesh optimization (HAM from now on).
The concept is very simple: because the corners around the render texture are not used (due to how the lenses refract the image), it’s a waste of GPU cycle to render them.
The solution? Mask away those corners either with the depth or stencil buffer.
OpenVR provides us with a mesh to use as a stencil mesh. But we have two problems with it:
- The HAM Valve provides uses too many triangle fans, which are inefficient for the GPU
- Valve provides HAMs for their Rift headsets, but that’s not usually the case for other vendors (as their lens visibility proprieties must be tested)
The first problem is about vertex layout. GPUs do not like tiny triangles and Valve’s HAM is full of them:

Instead our solution renders a single triangle and extends one of the vertex very far, so that it is rendered effectively like a quad:

Like I said, we achieved these “quads” using very large triangles and relying on viewport clipping. Still confused? Let’s put that vertex that’s very far away closer, and the trick is revealed:

The second problem is not actually Valve’s fault. They just can’t test every headset past and future, although they can update SteamVR with newer data. But if they get the HAM wrong accidentally (i.e. it blocks visible pixels), they could be accused of hampering the competition’s quality.
But there’s more to it: if users want to use other SDKs, the HAM is usually not available. So we decided to generate the HAM ourselves.
The tutorial loads the HAM settings from a config file so users can edit these files and add their own HAMs for headsets.
The Community is encouraged to improve this config file!
The way the config file works is by rendering two ellipses per eye (it’s a circle if the radius is the same in both x and y direction). The values are in clip space (i.e. in range [-1;1]) and are local to each eye.
The ‘eye’ ellipse will mask whatever is outside of it:

The ‘nose’ ellipse is a semi-ellipse drawn afterwards and will mask whatever is inside of it:

Please note the centers do not necessarily have to be inside the viewport. You can render a very big ellipse that is outside the screen and only a fragment touches the screen.
Radial Density Mask optimization
In Advanced VR Rendering Performance GDC 2016, a clever technique is used to trade off quality for speed.
The idea is to mask half the pixels (in blocks of 2×2 because GPUs work in at least units of that size) and then use a postprocessing filter to reconstruct the missing pixels. More pixels can be masked which decreases quality further but also increases performance.
It’s like mixing tiles rendered at different resolutions.
The concept is very similar to Variable Rate Shading but without HW accelerated support. VRS actually delivers higher quality because the depth is still rasterized at full resolution (like with MSAA), it’s only the pixel shader which gets run at a lower rate.
Because of this, quality-wise VRS is superior as it doesn’t suffer geometric aliasing; whereas Radial Density Masking does.
However VRS is currently only supported on Turing and newer GPUs (i.e. GeForce 2080) and the iPhone 11.
Our RDM reconstruction filter has multiple quality selections for half rate reconstruction. ‘High’ looks blurrier but offers overall the best quality. ‘Medium’ is a bit faster to reconstruct and in some cases can produce sharper text reconstruction. ‘Low’ is the fastest but looks pixelated.
Quarter and Sixteenth shading rates are always reconstructed using ‘low’ quality.
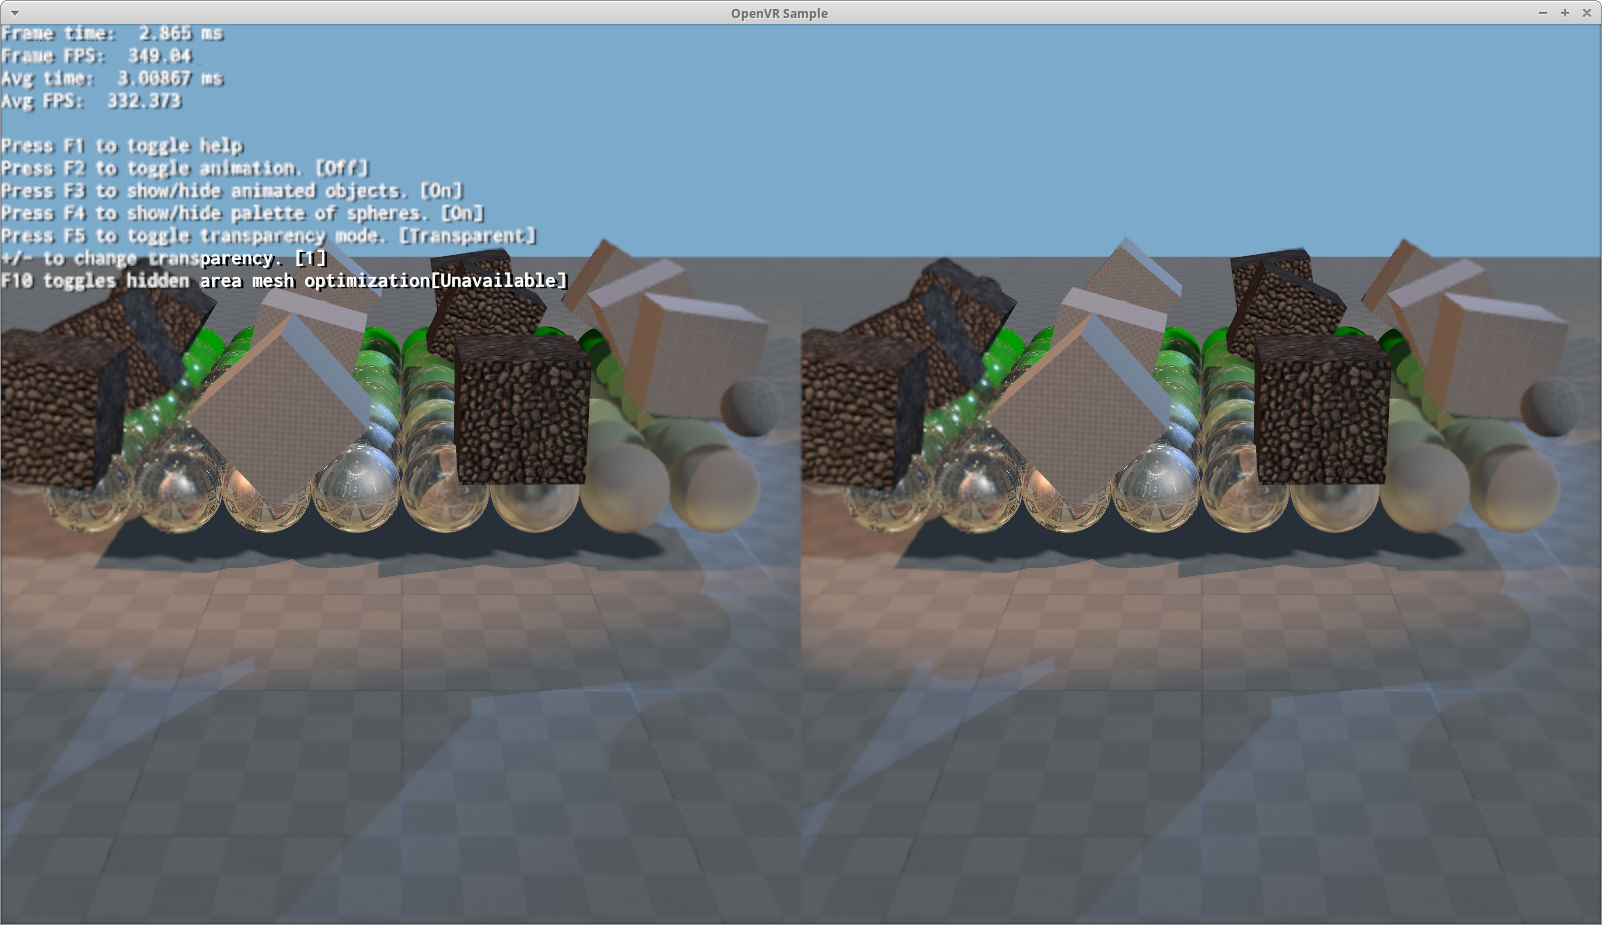
You can tell where the RDM starts when the text gets blurrier


(The dotted black bar on the right is a bug in the reconstruction filter that slipped through, it happens if we use high quality filter to reconstruct a tile adjacent to another tile at quarter or sixteenth rate; the filter must switch to low quality at the edge with other tiles).
I was skeptic it would work at all due to the use of discard to generate depth buffer masks, but turns out it does improve performance when GPU bound. Obviously the lower sampling rates offer bigger gains. I am impressed enough to wonder if it has applications outside of VR.
It’s essentially a twist on good ol’ multi-resolution rendering that is very common in games. The interest part is that, like Variable Rate Shading, it allows for dynamically choosing which tiles get shaded at which rate during a single pass.
Moving to Github
As Pavel anticipated in the last news post Ogre v1 and v2 branches got split into two repos, and they’re both living in Github now.
We have been researching into moving the v2 branch to Github for a while, and that decision got forced and sped up when Bitbucket announced they were removing all Mercurial repos as soon as next year.
Our new home for v2 is at:
https://github.com/OGRECave/ogre-next
We have yet to upgrade all of our website’s references: our quick start scripts still use the Mercurial repo, bugs should be reported to the Github ticket system, etc.
If you were mostly familiar with a TortoiseHg workflow, I have written a migration guide.
Continuous Integration
With Github comes benefits! Besides it’s amazing ticket system and easy Pull Request handling, there’s a lot of third party services for Continuous Integration!
We already setup AppVeyor for Windows builds. We’re still setting up Travis CI for building Linux platforms.
We’re also planning on setting up automatic deployment of documentation, and hopefully SDK releases as well.
Morph animations merged
We merged a Pull Request from user xissburg who contributed morph animations on v2 Items! Previously we have been relying on v1 Entities which provided this information.
This PR was merged against the v2-1 branch. It hasn’t yet been merged into v2-2 branch because:
- It needs a slight effort in adapting the shader changes to the refactored shaders for 2.2
- xissburg wants to use Compute Shaders in 2.2
However according to him there’s no ETA yet on the Compute Shaders. Because I don’t want the 2.1 and 2.2 branches to diverge too much and specially on this feature, I may end up merging his current contribution into 2.2, and he can later improve it further with compute.
Misc stuff
Today I’ve pushed a v2.2 commit deprecating a lot of v2.1 files.
This code had become dead in Ogre 2.2 and was only making everyone’s life harder trying to figure out what their role was (spoiler alert: nothing).
Users porting from Ogre 2.1 to 2.2 should still benefit from adding the Deprecated folder to their include paths, in order to make a gradual transition easier. Without these files you would get ‘file not found’ in your #include directives, and the old classes would cause errors wherever they appear.
Btw we’re always looking for help.
If you want to contribute code, open a ticket briefly commenting what you want to do and how you intend to tackle, so that we can give feedback to maximize the chances of it being painlessly included.
Just don’t go dark and suddenly appear with a huge PR to be merged, because it gets really hard for us to evaluate. Instead tell us your plan, and if you already have got code, keep us posted of your progress so we get to know it and send feedback.
If you have examples, a way to ease compilation for new users, or expand our documentation, submit a PR! Right now macOS is the hardest platform to build Ogre from scratch.
We could also use your help setting up the new CI infrastructure.