We just tagged the Ogre 13 release, making it the new current and recommended version. We would advise you to update wherever possible, to benefit from all the fixes and improvements that made their way into the new release. This release represents 2.5 years of work from various contributors when compared to the previous major 1.12 release. Compared to the last Ogre minor release (1.12.12), however we are only talking about 4 months. Here, you will mainly find bugfixes and the architectural changes that justify the version number bump.
The last 1.12 release had some serious regressions in D3D9 and GL1, therefore I scheduled one more release in the 1.12.x series.
Updated release notes
As the Ogre 1.12 series was an LTS release, many important features landed after the initial 1.12.0 release. To take this into account and to give an overview which version you need, the “New and Noteworthy” document was updated with the post .0 additions. (search for “12.” to quickly skim through them).
Nevertheless, there are also some new features in the 1.12.12 release itself:
Cubemap support in compositors
Compositors render targets can now be cubemaps by adding the cubic keyword to the texture declaration – just like with material texture_units.
To really take advantage of this, you can now also specify the camera to use when doing render_scene passes. This way any camera in your scene can be used as an environment-probe for cube mapping.
Finally, to really avoid touching any C++, there is now the align_to_face keyword which automatically orients the given camera to point to the targeted cubemap face.
Thanks to a contribution by Natan Fernandes there is now initial support of the Terrain Component in our C#/ Java/ Python bindings.
Python SDK as PIP package
Python programmers can now obtain a Ogre SDK directly from PyPI as they are used to with:
pip install ogre-python
Just as the MSVC and Android SDKs, it includes the assimp plugin which allows to load almost any mesh format and ImGui, so you can create a UI in a breeze. For now only Python 3.8 is covered – but on all platforms. This means you can now have a pre-compiled package for OSX and Linux too.
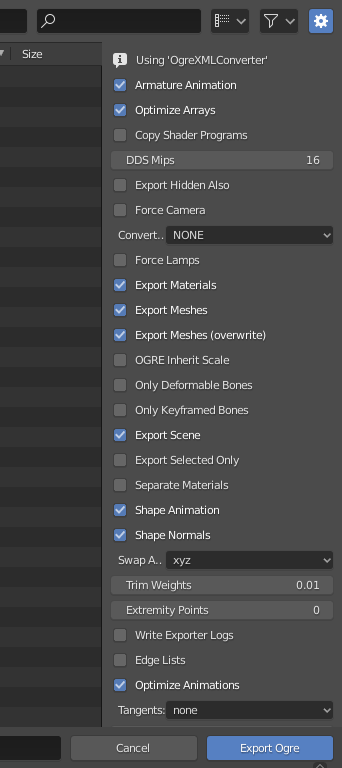
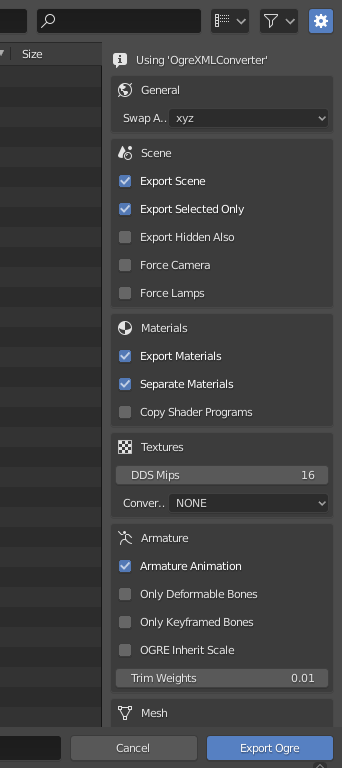
Improved blender2ogre
Thanks to some great work by Guillermo “sercero” Ojea Quintana, the blender2ogre export settings are much more user friendly now:
beforeafter
On top of having some context what a option might do, the exporter can now also let Ogre generate the LOD levels. This gives you the choice to
Iteratively apply blender “decimate” as in previous releases. This will generate one .mesh file per LOD level, but may result in a visually better LOD
use the Ogre MeshLOD Component. This will store all LOD levels in one .mesh file, only creating a separate index-buffer per LOD. This will greatly reduce storage compare to the above method.
SceneNode animations
But he did not stop there, blender2ogre now also exports NodeAnimationTrack based animations. To this end it follows the format introduced by EasyOgreExporter, so both exporters are compatible to each other.
To formalise this, he even extended the .scene type definition, so other exporters implementing this function can validate their output.
Needless to say, he also extended the DotScene Plugin shipped with 1.12.12 to actually load these animations.
.scene support in ogre-meshviewer
Picking up the work by Guillermo, I exteded ogre-meshviewer to load .scene file – in addition to .mesh files and whatever formats assimp knows about.
However, for now it will merely display the scene – there are no inspection tools yet.
Ogre 1.12.11 was just released. This is the last scheduled release for the 1.12 series and contains many bugfixes and new features. The smaller ones are:
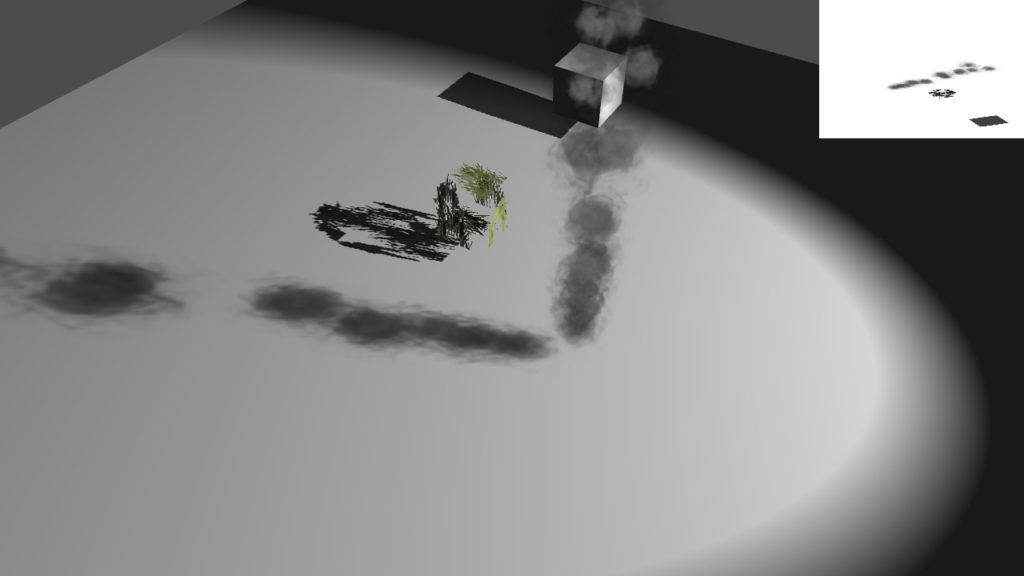
Support for animating particles via Sprite-sheet textures was added. This enables a whole new class of effects with vanilla Ogre that previously required using particle-universe.
beforeafterparticle system casting shadows
On the screenshots above, you see the Smoke demo, that was updated to showcase the new feature. However, the screenshots do not do full justice to the feature. If you are interested, it is best to download the SampleBrowser build and see the effect in action.
While at it, I fixed several bugs deep in Ogre that prevented ParticleSystems to be properly treated as shadow casters. Now you can call setCastShadows as with any other entity and things will just work (see last image).
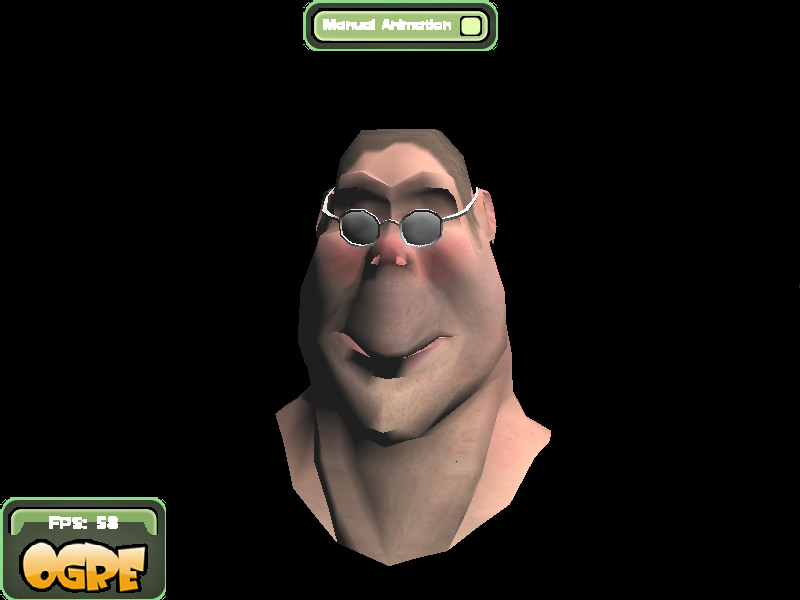
Software RenderSystem
Did you ever want to launch a Python Interpreter from your Shader or make HTTP requests per-pixel? Well, the wait is finally over – with the new TinyRenderSystem in Ogre 1.12.11 you can.
This render-system is based on the tinyrenderer project, which implements a full software-rasterizer in ~500 loc. If you are curious on how OpenGL works internally, I highly recommend taking a closer look. For Ogre this had to be doubled to about ~1350 loc, but compared to the Vulkan RenderSystem from 2.x at ~24000 loc it is still tiny (note that this is already after stripping down the v2.3 implementation).
So what do we gain by having that RenderSystem? First it is a nice stress-test for Ogre, as this is a backend implemented in Ogre itself; each Buffer uses the DefaultBuffer implementation and each Texture and RenderWindow is backed by an Ogre::Image. This makes it also a great fit for offline conversion tools, that want full access to the resources, without needing to actually access the GPU.
Next, this is really useful if you want to Unit-Test a Ogre-based application. Typically, you would need to set-up a headless rendering server (more on that below) to merely check whether your triangle is centered correctly in the frame. This is super easy now.
The screenshots on top, taken from the SampleBrowser, show you how far you can actually get with the RenderSystem. Note that there is no alpha blending, no mipmapping, no user-provided shaders and generally no advanced configuration of the rasterization. So if you are after full-featured software rasterization, you are better off with OpenGL on MESA/llvmpipe.
However, if you want to experiment with the rendering pipeline without being bound by the OpenGL API, this is the way to go. You actually can do the HTTP requests per pixel ;). Also, for creating a new RenderSystem, this is the least amount of reference code to read.
Transparent headless mode on Linux
Rendering on a remote machine over ssh just got easier! Previously ogre required a running X11 instance, which can be a hassle to come by on a machine without any monitors attached (e.g. a GPU server).
Instead of bailing out, Ogre will now merely issue a warning and transparently fall-back to a PBuffer based offscreen window. See this for the technical background.
To be able to do so Ogre must be using EGL instead of GLX, to do so it must be compiled with OGRE_GLSUPPORT_USE_EGL=1. With 1.13, we will be using EGL instead of GLX by default.
Compared with the EGL support recently added in v2.2.5, the implementation is much simpler and does provide any configuration options – but on the plus side the flag above is the only switch to toggle to get it running.
As a small Christmas present, I want to show you how easy it has become to make Augmented Reality yourself thanks to Ogre and OpenCV. You should know that my other interest, besides graphics, lies with Computer Vision. The demo will not rely on proprietary solutions like ARCore or ARKit – all will be done with open-source code that you can inspect an learn from. But lets start with a teaser:
This demo can be put together in less than 50 lines of code, thanks to the OpenCV ovis module that glues Ogre and OpenCV together. Next, I will briefly walk you through the steps that are needed:
First, we have to capture some images to get by the Reality part in AR. Here, OpenCV provides us an unified API that you can use for your Webcam, Industrial Cameras or a pre-recorded video:
import cv2 as cv

imsize = (1280, 720) # the resolution to use
cap = cv.VideoCapture(0)
cap.set(cv.CAP_PROP_FRAME_WIDTH, imsize[0])
cap.set(cv.CAP_PROP_FRAME_HEIGHT, imsize[1])

img = cap.read()[1] # grab an image
then, we have to set up the most crucial part in AR: camera tracking. For this, we will use the ArUco markers – the QR-like quads that surround Sinbad. To no surprise, OpenCV comes with this vision algorithm:
adict = cv.aruco.Dictionary_get(cv.aruco.DICT_4X4_50)
# extract 2D marker-corners from image
corners, ids = cv.aruco.detectMarkers(img, adict)[:2]
# convert corners to 3D transformations [R|t]
rvecs, tvecs = cv.aruco.estimatePoseSingleMarkers(corners, 5, K, None)[:2]
If you look closely, you see that we are using a undefined variable "K" – this is the intrinsic matrix specific for your camera. If you want precise results, you should calibrate your camera to measure those. For instance using the web-service at calibdb.net, which will also just give you the parameters, if your camera is already known.
However, if you just want to continue, you can use the following values that should roughly match any webcam at 1280x720px
import numpy as np
K = np.array(((1000, 0, 640), (0, 1000, 360), (0, 0, 1.)))
So now we have the image and the according 3D transformation for the camera – only the Augmented part is missing. This is where Ogre/ ovis come into play:
# reference the 3D mesh resources
cv.ovis.addResourceLocation("packs/Sinbad.zip")
# create an Ogre window for rendering
win = cv.ovis.createWindow("OgreWindow", imsize, flags=cv.ovis.WINDOW_SCENE_AA)
win.setBackground(img)
# make Ogre renderings match your camera images
win.setCameraIntrinsics(K, imsize)
# create the virtual scene, consisting of Sinbad and a light
win.createEntity("figure", "Sinbad.mesh", tvec=(0, 0, 5), rot=(1.57, 0, 0))
win.createLightEntity("sun", tvec=(0, 0, 100))
# position the camera according to the first marker detected
win.setCameraPose(tvecs[0].ravel(), rvecs[0].ravel(), invert=True)
To record the results, you can use win.getScreenshot() and dump it into a cv.VideoWriter – contrary to the name, this works in real-time.
Extending the above code to use cv.aruco.GridBoard as done in the teaser video is left as an exercise for the reader as this is more on the OpenCV side.
Also, If you rather want to use ARCore on Android, there is a Sample how to use the SurfaceTexture with Ogre. Using this, you should be able to modify the hello_ar_java sample from the arcore-sdk to use Ogre.
Due to some work on WGL, you can now build and use the GLES2 RenderSystem on windows without any glue libraries like ANGLE. Consequently it is included in the SDK, so it is easy to try. If you are on NVIDA/ Intel that is – AMD does not support the respective extension. There are no screenshots here, as they would look almost exactly like on GL3+.
Improved RenderToVertexBuffer
Shaders bound to RenderToVertexBuffer (aka. Transform Feedback/ Stream Output) can now use auto parameters (param_named_auto) as in any other stage.
Furthermore the D3D11 implementation was updated and the GPU particles samples now also runs on D3D11 too.
Improved ParticleSystem
The ParticleSystem and the default BillboardParticleRenderer received some optimization regarding Colour and bounds related computations.
While working on the Particles I got the idea that one could re-purpose the existing BillboardSet for 3D text rendering, and indeed it fits perfectly as you see above. No more snippets from the Wiki needed and everything integrates with the existing API as:
auto font = FontManager::getSingleton().getByName("SdkTrays/Caption");
auto bbs = mSceneMgr->createBillboardSet();

font->putText(bbs, "OGRE\n ...", 10);
Furthermore, I fixed the glyph packing code which now correctly aligns the font-atlas elements, thus obsoleting the character_spacer tuning option.